Well, I have had a two week absence from blogging, facebook, twitter, and just about everything else. About two weeks ago I ran into major computer trouble, probably stemming from repeated power spikes and outages.
Anyway, I spent about a week trying to recover my computer, until it was clear to me that it was not going to recover. So then I spent about a week waiting for my new computer to arrive in the mail. It got here yesterday and I have been installing updates and software until just now. It works! It works great, in fact. I bought one with Windows Vista so I am getting used to that, had XP before. I bought it from geeks.com (no affiliation), and I have to say they shipped it out really quickly (next morning) and it's exactly as described.
I hope to be back in the full swing of the fiber arts action soon, and am looking forward to making some beautiful treasuries in the next few days.
-Jennifer

Wednesday, June 8, 2011
Saturday, May 14, 2011
Coffee Cup Sleeves- Four Designs to Crochet
 I have just listed my newest crochet pattern on Etsy and Ravelry, my coffee cup sleeves (or click here for the Ravelry link). About a year ago, my best friend Heather asked me to make a coffee cup sleeve for her, and so I did. Then I made about 20 more! Of course, some of the ones I came up with don't really work as patterns, and some were knit rather than crochet. I chose these 4 designs for my pattern collection because they are fun and versatile. I used several of them for adult stocking stuffers last Christmas.
To celebrate the new pattern in my store, I am going to release a scrubbie pattern here on my blog for free this coming week, so check back for that.
 |
| Right to Left: Frills Sleeve, Baubles Sleeve, Squares Sleeve |
 |
| Ruffle Sleeves |
 |
| Right to Left: Squares Sleeve, Baubles Sleeve, Frills Sleeve |
 |
| Ribbed Knit Sleeve |
-Jennifer
Thursday, May 12, 2011
Chrysanthemum Bracelets
I am working on a new line of crocheted jewelry, and I have finished the first design. The line is inspired by Chinese culture, and in this case, the chrysanthemum. I have a lotus and a dragon in the works as well as some bamboo designs. It's really fun working on some new stuff! I am going to make all of these into patterns, but for now, I am offering the finished bracelets in my store. Here is the design in several colors:


-Jennifer

-Jennifer
Monday, May 9, 2011
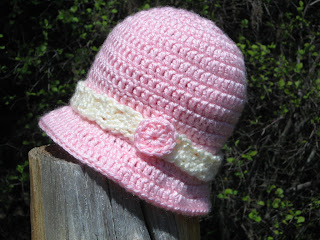
Sunny Day = New Hat Pix
Today is so sunny and beautiful that I decided to take advantage and get some outdoor photos of my hats. I was home alone so there was no one here to bother me but the dog while I was doing it. I think I got some great results. Some people say that full sun photos aren't good because the sun washes out the colors, but I think these turned out ok. Also, I love the spring flowers in my photos!
-Jennifer
 |
| Woods Hat |
 |
| Sailing Hat - Baby |
 |
| Sailing Hat - Grade Schooler |
 |
| Sailing Hat (Pattern) |
 |
| 'Lil Love Hat (Pattern) |
 |
| Flower Garden Hat and Purse (Pattern) |
Tuesday, May 3, 2011
Interview at INW Team's Blog
I've been interviewed by Monti of Glitz N Glass over at the Inland Northwest Etsy Street Team's blog. It was kinda strange to talk about myself like that but I got into it. I mean, we are all our own favorite subject, right? Check it out if you have a chance: http://ewateam.blogspot.com/2011/05/interview-with-jennifer-of.html
Wednesday, April 27, 2011
Etsy Shop Makeover!
A few days ago, I was lucky enough to win a premade shop set by Sara Rubendall and today I got the new banner and avatar installed in my shop and this very blog! It looks so great and it's such a huge improvement from what I had before. Thank you so much Sara for doing this giveaway and choosing my shop! Sara has an amazing selection and great prices, so check out her shop if you are looking to make a professional impression with your online store.
Here are some of my favorites:
 -Jennifer
Here are some of my favorites:
Sunday, April 24, 2011
Easter Nest and Book Review
Well, late Saturday night I finished crocheting my Easter gift for my mom. Hahaha

At least I got it done in time for Easter. I had intended to finish it about a week earlier but I found that working with rafia really hurt my fingers and I could only do so much in one day. Sadly the eggs are a little too big for the nest. I might crochet some smaller eggs for it, but I am definitely NOT making a bigger nest!
Let me state that this book was given to me by a friend who is not affiliated with the book's author or publisher in any way.
The first thing I like about the book is that it has BOTH knit and crochet stuff, because I like to mix it up, and it is hard to find patterns to knit little detailed objects. A few of the projects combine knit and crochet, but most of them are either or.
The first section of the book is about techniques and materials. Many of the techniques used in the patterns are pretty advanced, so I felt that section of the book was rather wasted. By the time you are advanced enough to work these patterns you will already know the difference between worsted and DK weight yarn, for example. I think a shorter section with just the most unusual techniques would have saved some paper.
The next two sections are the patterns, and they are so creative and cute! There are plenty of fun and inspiring projects from spiders and caterpillars to mushrooms and leaves to wheat and birds. As I mentioned above, many of them are advanced, but there are beginner and intermediate ones too. If you are working on expanding your skills this book might be just the challenge you need.
Hope this helps and have fun crafting!
-Jennifer

At least I got it done in time for Easter. I had intended to finish it about a week earlier but I found that working with rafia really hurt my fingers and I could only do so much in one day. Sadly the eggs are a little too big for the nest. I might crochet some smaller eggs for it, but I am definitely NOT making a bigger nest!


75 Birds, Butterflies & Little Beasts to Knit and Crochet Review
I got the pattern for this nest and for the eggs from the book 75 Birds, Butterflies & Little Beasts to Knit and Crochet by Lesley Stanfield. I thought I would write a little review of it in case anyone is interested in making their own nest.Let me state that this book was given to me by a friend who is not affiliated with the book's author or publisher in any way.
The first thing I like about the book is that it has BOTH knit and crochet stuff, because I like to mix it up, and it is hard to find patterns to knit little detailed objects. A few of the projects combine knit and crochet, but most of them are either or.
The first section of the book is about techniques and materials. Many of the techniques used in the patterns are pretty advanced, so I felt that section of the book was rather wasted. By the time you are advanced enough to work these patterns you will already know the difference between worsted and DK weight yarn, for example. I think a shorter section with just the most unusual techniques would have saved some paper.
Patterns grouped by theme
The next section has pictures of the finished objects grouped by theme. This was really nice to spark some creative ideas of what to make together. There is also a section in the back with some "project pictures," which is really just some ideas of how to use these crocheted beasties.The next two sections are the patterns, and they are so creative and cute! There are plenty of fun and inspiring projects from spiders and caterpillars to mushrooms and leaves to wheat and birds. As I mentioned above, many of them are advanced, but there are beginner and intermediate ones too. If you are working on expanding your skills this book might be just the challenge you need.
A few caveats
Overall, I like the book a lot. A LOT. However, I do have a few bones to pick with it. First, although it says the patterns are written in US style, in many places non-standard terminology is used. For example, in the crochet section "miss" is used instead of "skip". This may throw off beginners. I suspect that the book was written English style first and then converted. Second, most of the patterns don't have yarn and needle/hook recommendations. In fact, I don't think ANY of them have needle or hook recommendations and most don't have yarn listed either. I would have liked at least to see what was used in the example photo. When making my nest I had to start over after 6 rounds because I wasn't using a big enough hook. For a non-standard material, I feel the author should have recommended a hook.Hope this helps and have fun crafting!
-Jennifer
Monday, April 18, 2011
Lil Love Purse Crochet Pattern Decisions
Well, first let me apologize for the long delay in blog posts. My computer died and I just got it fixed. It was really a shock to my system not to have my computer available, and I barely knew what to do with myself!
During my down time, I did some designing and some looking at my patterns. I decided that at least one of them could use some improvement. I have this heart themed crochet pattern set for sale, called Lil Love.
I was looking at the purse and wondering what could be done to improve it.The purse alone looks like this:
So, the strap looks a little thin, and I decided to do a little experiment. I made this version of the purse with a ruffle on the strap.
Now I'm wondering, which one looks better? Both of my parents like the one with no ruffle, but I like the ruffled one more. I'm wondering what people would rather give their little girls, as well. Any feedback would be welcome!
-Jennifer
During my down time, I did some designing and some looking at my patterns. I decided that at least one of them could use some improvement. I have this heart themed crochet pattern set for sale, called Lil Love.
 |
| Lil Love Hat and Purse |
I was looking at the purse and wondering what could be done to improve it.The purse alone looks like this:
 |
| Lil Love Purse - no ruffle |
So, the strap looks a little thin, and I decided to do a little experiment. I made this version of the purse with a ruffle on the strap.
 |
| Lil Love Purse - strap ruffle |
Now I'm wondering, which one looks better? Both of my parents like the one with no ruffle, but I like the ruffled one more. I'm wondering what people would rather give their little girls, as well. Any feedback would be welcome!
-Jennifer
Thursday, March 31, 2011
My Grandmas Lace Edgings
Today I posted the last of my grandma's handmade lace edgings in my Etsy shop. Grandma used to make these with her odds and ends of crochet thread, and many of them she sewed to towels and gave away. She would sew a swan onto the towel and leave the top unsewn. Then you could put a washcloth into the swan.
For some reason she gave a huge sack of unattached ones to my mom. Mom didn't use them for anything and she asked me to sell them. Grandma just turned 90 this month, and she can't do thread crochet anymore. I decided to save one set of edgings and listed the rest on Etsy. They needed to be ironed and photographed, and many of them needed to be cleaned, so it has taken me about two months to list them all! (Some of them needed a little finishing as well.) Of course I was taking my own sweet time at it too. :) It was really a pleasure to work with my grandma's stuff, and see the detail of her work.
Without further ado, here are some pictures of today's listing:


And here's some purple trim that she had sewn on a towel:
 -Jennifer
For some reason she gave a huge sack of unattached ones to my mom. Mom didn't use them for anything and she asked me to sell them. Grandma just turned 90 this month, and she can't do thread crochet anymore. I decided to save one set of edgings and listed the rest on Etsy. They needed to be ironed and photographed, and many of them needed to be cleaned, so it has taken me about two months to list them all! (Some of them needed a little finishing as well.) Of course I was taking my own sweet time at it too. :) It was really a pleasure to work with my grandma's stuff, and see the detail of her work.
Without further ado, here are some pictures of today's listing:


And here's some purple trim that she had sewn on a towel:

Saturday, March 26, 2011
Crochet Thread Review - Patons Pearl Twist
I've decided to add some product reviews so people can get a sense of what is out there and not be limited to standard materials. Today I am looking at Patons Pearl Twist.
Just so you know, I purchased today's review item myself, and I am not affiliated with Patons in any way.

This is a thread made from 80% acrylic and 20% nylon. Unfortunately, the thread has been discontinued, but if you happen across it or any other acrylic tread, this review will be useful. Most crochet threads are made from cotton, and cotton threads are more stiff and less fuzzy. This acrylic tread is extremely supple and more like yarn. I was able to iron a doily that I made with it, with no melting. I would definitely use the iron on a low/medium heat. Here's a picture of some ornaments I crocheted with the thread, where you can see that it is somewhat fuzzy.

Patons Pearl Twist doesn't have a thread size listed on it, and the label only lists knitting needle sizes: 4mm or US6. Most pearl crochet threads are size 3 and typically use a size E (US) crochet hook. This pearl thread is a little bit bigger than size 3. I used it to crochet some doilies along with a size 3 white thread and the slight size difference didn't cause me too much of a problem. With a really intricate doily or carefully sized item (such as amigurumi), I would not use this thread. Here is a picture of the White Waves Doily I made with this thread. The blue is Patons Pearl Twist and the white is size 3 pearl cotton.
 Hope this review helps and keep crafting!
-Jennifer
Just so you know, I purchased today's review item myself, and I am not affiliated with Patons in any way.

This is a thread made from 80% acrylic and 20% nylon. Unfortunately, the thread has been discontinued, but if you happen across it or any other acrylic tread, this review will be useful. Most crochet threads are made from cotton, and cotton threads are more stiff and less fuzzy. This acrylic tread is extremely supple and more like yarn. I was able to iron a doily that I made with it, with no melting. I would definitely use the iron on a low/medium heat. Here's a picture of some ornaments I crocheted with the thread, where you can see that it is somewhat fuzzy.

Patons Pearl Twist doesn't have a thread size listed on it, and the label only lists knitting needle sizes: 4mm or US6. Most pearl crochet threads are size 3 and typically use a size E (US) crochet hook. This pearl thread is a little bit bigger than size 3. I used it to crochet some doilies along with a size 3 white thread and the slight size difference didn't cause me too much of a problem. With a really intricate doily or carefully sized item (such as amigurumi), I would not use this thread. Here is a picture of the White Waves Doily I made with this thread. The blue is Patons Pearl Twist and the white is size 3 pearl cotton.

-Jennifer
Wednesday, March 16, 2011
Knitted Lace Project
Recently I had some ideas for knitted pants and shorts, and I realized I didn't really have all the skills to make them. For one thing, I know how to make my own size, by working off my own pants and body, but I don't really know how to make other sizes. That's OK if they are just for me, but not if I want to sell the pattern. For another thing, I can knit lace from a pattern, of course, but I'm not that strong at coming up with my own knitted lace designs. I decided to work on my lace skills first, since that seems a lot more fun to me. I made a cowl for my best friend heather, and I am making other lace designs into a dishcloth series.
Here is the cowl on my mom:
And here are some of the dishcloths I've made, some more successful than others:
I tried making a table runner from cotton thread but I ran into a couple hitches. Number 1, I was making it in black and I like to craft in front of my computer so I can listen to podcasts at the same time. (Favorite 2 podcasts=Doug Loves Movies and The Moth) Unfortunately, the lighting isn't strong enough to see the black thread very well. Number 2, I only have metal needles in the right size and they were really annoying. Number 3, holy crap knitting size 10 thread is slow going! I think I did about 1/2 inch per hour. Of course that was at the same time as I was trying to learn the pattern, but I don't think it would ever get much faster, at least for that particular pattern. Numbers 1 and 2 could be solved with a trip to the store, but the lace went so slowly, that I abandoned it. I will try again with size 3 thread when I get better lights. I did try to buy new lights but I couldn't remember what size to get when I was at the store.
Here's a look at my crafting station:
-Jennifer
Here is the cowl on my mom:
 |
| My knit lace cowl design |
 |
| From top left moving clockwise: Cat's Eye, Honeycomb, Fir Cone, Cross Stitch |
Here's a look at my crafting station:
 |
| "Crafting" Station |
Thursday, March 10, 2011
Crochet How To Basics: Double Crochet (dc)
Today's tutorial is on how to make a double crochet (abbreviated dc). For this tutorial you will need to know how to make a chain stitch as well.
First, chain 10.

Now, yarn over (pass the yarn around the crochet hook). Put the crochet hook into the middle of the 4th chain from the hook. When making double crochets, it is standard to skip the first 3 chain stitches, and count those first 3 stitches as one double crochet stitch.

Then, draw the yarn through the chain stitch. You now have 3 loops on the crochet hook.

Draw the yarn through the first 2 loops on the crochet hook. Now you have 2 loops on the hook.

Draw the yarn through the last 2 loops on the crochet hook. You have made a double crochet stitch!

Make a double crochet in the next chain in and in all the remaining chains. You now have 8 dc (7 real dc and 1 "honorary" dc made by the first 3 chain stitches). What you have just done would typically be written like this: Ch 10, dc in 4th ch from hook (first 3 ch count as dc), dc in remaining ch: 8 dc.
 Now we are going to add a row. The first thing to do is ch 3 (make 3 chain stitches). Then turn the work without turning the hook.

Once again, these 3 chain stitches count as a dc. Yarn over and insert the hook through the top loops of the 2nd dc from the hook. (We have already made a "dc" in the first stitch with our ch 3.)

Continue to make the double crochets as before.

Make a dc in each remaining dc. For the last stitch, make the dc in the top chain of the chain 3 from the last row. The instructions for the 2nd row you have just made usually look like this: Ch 3 (counts as first dc), turn, dc in 2nd dc and each remaining dc.

This is all you need to know to make dc stitches! Why not try making a scarf with your new double crochet skills? Get a really soft worsted weight yarn (6 oz) and use a size H crochet hook.
Row 1: Ch 32, dc in 4th ch from hook (first 3 ch count as dc), dc in remaining ch: 30 dc
Row 2: Ch 3 (counts as first dc), turn, dc in 2nd dc and each remaining dc.
Rows 3+: Repeat row 2 until scarf reaches desired length. Fasten off. (Fasten off means cut the yarn. Enlarge the loop on the hook until it is about 3 inches long and cut the yarn at the top.)
Weave in ends. (This means hide the yarn ends at the beginning and end of the work in the piece, either with the crochet hook or a tapestry needle.)
If you want to get creative with it, try alternating rows of single crochet and double crochet. That way you practice your single crochet too!
Have fun and keep learning! -Jennifer
First, chain 10.

Now, yarn over (pass the yarn around the crochet hook). Put the crochet hook into the middle of the 4th chain from the hook. When making double crochets, it is standard to skip the first 3 chain stitches, and count those first 3 stitches as one double crochet stitch.

Then, draw the yarn through the chain stitch. You now have 3 loops on the crochet hook.

Draw the yarn through the first 2 loops on the crochet hook. Now you have 2 loops on the hook.

Draw the yarn through the last 2 loops on the crochet hook. You have made a double crochet stitch!

Make a double crochet in the next chain in and in all the remaining chains. You now have 8 dc (7 real dc and 1 "honorary" dc made by the first 3 chain stitches). What you have just done would typically be written like this: Ch 10, dc in 4th ch from hook (first 3 ch count as dc), dc in remaining ch: 8 dc.


Once again, these 3 chain stitches count as a dc. Yarn over and insert the hook through the top loops of the 2nd dc from the hook. (We have already made a "dc" in the first stitch with our ch 3.)

Continue to make the double crochets as before.

Make a dc in each remaining dc. For the last stitch, make the dc in the top chain of the chain 3 from the last row. The instructions for the 2nd row you have just made usually look like this: Ch 3 (counts as first dc), turn, dc in 2nd dc and each remaining dc.

This is all you need to know to make dc stitches! Why not try making a scarf with your new double crochet skills? Get a really soft worsted weight yarn (6 oz) and use a size H crochet hook.
Row 1: Ch 32, dc in 4th ch from hook (first 3 ch count as dc), dc in remaining ch: 30 dc
Row 2: Ch 3 (counts as first dc), turn, dc in 2nd dc and each remaining dc.
Rows 3+: Repeat row 2 until scarf reaches desired length. Fasten off. (Fasten off means cut the yarn. Enlarge the loop on the hook until it is about 3 inches long and cut the yarn at the top.)
Weave in ends. (This means hide the yarn ends at the beginning and end of the work in the piece, either with the crochet hook or a tapestry needle.)
If you want to get creative with it, try alternating rows of single crochet and double crochet. That way you practice your single crochet too!
Have fun and keep learning! -Jennifer
Sunday, February 20, 2011
Crochet Finishing Tips - Working In the Round
Today's tip will help you finish your crochet pieces so that they look more smooth and professional.
First, let's look at how to tie in the yarn so that the last stitch looks seamless. The first step is to leave yourself enough yarn when you fasten off to be able to add your finishing touches to the piece. To finish off the last stitch you only need about 4-5", but in this case I have left about 18" because I am finishing the slip stitch join on every row as well (see below). Here's a picture of a hat worked in the round, with the last stitch joined with a slip stitch.
 I find it easier to finish pieces with a tapestry needle, though you can use a crochet hook as well. If using a tapestry needle, thread it now. Then skip the first two stitches of the round and pass the needle under both loops of the third stitch.


 In the second picture, you are working through the top of the dc to the right of the ch 3 and through the top of the ch 3.


First, let's look at how to tie in the yarn so that the last stitch looks seamless. The first step is to leave yourself enough yarn when you fasten off to be able to add your finishing touches to the piece. To finish off the last stitch you only need about 4-5", but in this case I have left about 18" because I am finishing the slip stitch join on every row as well (see below). Here's a picture of a hat worked in the round, with the last stitch joined with a slip stitch.


Draw the yarn through and pass the needle from the top down through the loop left from the last slip stitch worked and under the back loop of the second stitch of the round.

Draw the yarn through and either tie in the end or move on to the next finishing step. As you can see the last stitch now looks like any other stitch in the round.

Here is a picture of a hat worked in the round. Pieces worked in the round with a slip stitch join at the end of every round (rather than spiral) always have a visible break at every joining, shown here:

For double crochet pieces, you can close up these breaks by following these steps. First, leave a very long tail when you fasten off, about three times the length of the piece. Thread this tail onto a tapestry needle, and work on the back side of the piece. Thread the tail through the chain 3 at the beginning of every round as shown in these pictures.
In the first picture, you are working through the bottom of the dc to the left of the ch 3 and then through the middle of the ch 3.


Continue weaving back and forth like this for the rest of the rounds. Be careful not to pull the finishing yarn too tight or you will have gaps to the left and right of the dc you are working with.
Here is a picture of the hat after finishing. The end of each round is still visible, but it looks much smoother.

I hope this tutorial makes your finished pieces look that much more special!
-Jennifer
Subscribe to:
Posts (Atom)